Wednesday, June 3, 2009

Is it EASY to be GREEN?

Being GREEN these days is synonymous with having an eco-friendly lifestyle, but what does that mean? Where do you start and do you have time to join this movement of eco-friendly living?

For those of you who remember Kermit the Frog’s song – “It’s not easy being green” – we don’t have to blend in with nature and the leaves in order to help our planet. In fact, being green IS easy, easier than you think. Here are three ideas on how to start your journey to becoming GREEN.

The first step is to “divide and conquer”. We have 3 bins at home: blue box, green cart and regular garbage bin. Before tossing any garbage item, I make sure it goes into the correct bin. But what goes in each bin you may ask?
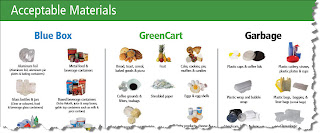


This is great reference page that shows you exactly what materials are acceptable for the blue box, green cart and regular garbage. Print it out and leave it on your fridge or near your recycling area as a handy reference:

http://www.halton.ca/ppw/waste/documents/acceptablematerials.pdf


Second, consider the commonly-heard phrase, “Reduce, Reuse, Recycle”.

Reduce: How much of the Earth's resources do we use?
Reuse: Don't just throw it away. Could someone else make use of it?
Recycle: Can the materials be made into something new?


Our closets are probably the best example.

Every season or twice a year, clean out your closet. To make this process easy, use three laundry baskets and label them: Donate, Keep, Repair. Once you are ready, ask yourself ONE easy question and be honest! Have I worn this outfit in the last two years? If the answer is no, donate it. Check out for organizations in your local area that are in need of gently worn clothing. There are companies who help clothe people who cannot afford to buy business clothes for interviews. Others repair shoes and ship them to under-developed countries. Check out some eco-tips for reducing, reusing and recycling:
http://www.globalstewards.org/ecotips.htm


Finally, “Buy Local”. If you don’t have access to a Farmer’s Market, you can still buy local fruits and vegetables since every supermarket now shows where the product comes from. Choosing fruits and vegetables grown in your area will also help your pocket book! Foodland Ontario also has a great guide of which fruits and vegetables are available throughout the year.


You can check out this guide:
http://www.foodland.gov.on.ca/english/availability.html

When buying flowers, also ask where they are from. Some flowers are shipped from the other side of the world. Just think about all the fuel used to transport them! I have found a couple of supermarkets that own greenhouses and grow their own flowers and plants all year long! Also, buying flowers that are in season and grown locally will cost you less.


Start small, one area at the time, and before you know it, you are living GREEN!

Thursday, March 19, 2009

Five things I learned at the Ontario SolidWorks UGM

I attended the Ontario SolidWorks User Group Meeting hosted by Chris White & Richard Matthews on March 4th, 2009. It was a great way to meet our customers, listen to what they were looking for in the software and learned 5 great SolidWorks tips that I would like to share with you. I have been using SolidWorks for over 7 years and was pleasantly surprise at the small changes one can make to optimize using SolidWorks.


1. Faster startup with SolidWorks


The SolidWorks RSS feeds in the task pane are a great way to read the latest news from SolidWorks, Technical Alerts and Community news. When launching SolidWorks, these feeds are refreshed and might slow down the startup. By disabling the RSS feeds on startup, SolidWorks will launch in a flash!

To do this: in SolidWorks, go to the Tools menu, Options, System Options, General. Disable “Show latest news feeds in task pane.”

Don’t worry; you can still read the latest news by opening the Task Pane and selecting the “Latest News” button under the Community box.

2. Colour-code open edges for surfaces

For those who import third party data on a regular basis, you will find this tip very helpful. When a solid is imported in SolidWorks, sometimes, there might be open edges or surfaces that need to be repaired and patched. How can one identify these? By changing the colour! Simple, I know.

To do this,
* In SolidWorks, go to the Tools menu, Options, Colors.
* Under “color scheme settings” locate “Surfaces, open edges”.
* Click on the Edit button to chage the colour. In this example, set to red.

If you want to test this, open the following part under the sample files in SolidWorks:
C:\Program Files\SolidWorks Corp\SolidWorks\samples\tutorial\importexport\ importerrors.x_b

Note: When opening this part, don’t run the Import Diagnosis tool – check first the open surfaces as per the image below – all highlighted in red and easy to spot!

3. Embed an eDrawing to a PowerPoint® presentation

eDrawings is a great communication tool that can be used during design reviews or presentations. If you have published an eDrawing of your design, you can also add it to your PowerPoint® presentation. The full user interface will be available – markups, exploded views, measure


To do this:

* Open a new/existing PowerPoint® document
* Click Insert, Object.
* Select eDrawings Control for Object type
* Once the object is inserted, right-click the eDrawings Control box and select Properties.
* For FileName, browse to any eDrawings file, then click OK.
* Select EnableFeatures, then browse to the Property Pages dialog box.
* Set the options, then click OK.
* Close the Properties box.
* To view the eDrawings file: view the slide show (PowerPoint)


In the Property Pages box, you will be able to enable as many features as necessary during the presentation. Some users might not want to see the toolbars or the user interface. Others might want to make sure the files are open read-only. You have plenty of options through the Property Pages under the Enable Feautres area.


4. Task scheduler to rebuild components updates simulations & render.

The SolidWorks Task Scheduler lets you set up tasks to perform at a future time since it runs separately from the SolidWorks application. You can schedule a task to be performed only once or on a daily, weekly, or monthly basis.

For example, if you need to perform a resource-intensive task such as rebuilding a large assembly, you can use SolidWorks Task Scheduler to perform the job at off-peak hours.

You can use Task Scheduler to manage rendering tasks you set up in PhotoWorks or animation tasks you set up in Motion Studies.

You can also schedule tasks to update the SolidWorks Simulation analysis in SolidWorks part and assembly documents.

To access it:

Under the Windows Start menu go to:
SolidWorks/SolidWorks Tools/SolidWorks Task Scheduler.

5. Structural members (weldments) are meshed as beam elements by default.

In SolidWorks Simulation, when working with structural members (weldments), they are treated as beam elements by default. A joint is identified at free ends of structural members and at the intersection of two or more structural members. The program creates a node at the center of the cross section of each joint member. Due to trimming and the use of different cross sections for different members, the nodes of members associated with a joint may not coincide. SolidWorks creates special elements near the joint to simulate a rigid connection based on geometric and material properties.

Modeling with structural members (weldments) will save you time when analyzing your structures.